Some spreadsheets and an Office Label printer are enough
Most hunters know it:
the hunted piece was broken open according to all the rules of game hygiene art, then cooled as it matured and then dismembered.
The reward for the work is shrink-wrapped, ready-to-cook portions of the best venison.
The only thing missing is proper labeling of the portions - especially if you also want to market part of your venison.
Label everything?! :-S
This isn't much fun with the corresponding throughput and doesn't look appealing to me either.
In the meantime there are already wonderful pre-printed game stickers. You still have to write the portion information by hand in a legible way, despite the tick box.
I got tired of my scribbling by the end of work. It was tedious and, as I said, didn't look good.
So I started looking for a solution that would reduce the amount of writing and also look attractive.
My demands on the label for my game portions
The solution to my label problem should meet the following criteria:
- simple & quick recording of the portion data
- attractive venison portion label
- if necessary, a simple portion management
In order to be able to create attractive labels, I needed a label or label printer and the appropriate software to design the labels.
A simple office label printer with office label rolls is suitable for printing labels that are suitable for our freezer use.
The software for designing the labels and for serial printing is usually supplied with the printer. This is perfectly sufficient for the wild labels.
I have a Brother QL-570 label printer for my game portions and print my labels from a 62mm endless roll. The printer prints and cuts the labels to length. My labels then have the handy dimensions of 62x100mm in landscape format.
Everyone can easily adapt the format and design framework of their labels according to their requirements.
What goes on the venison label?
First of all, all the important information for venison lovers can be seen:
- which piece of which wild animal is it?
- what does it weigh and cost?

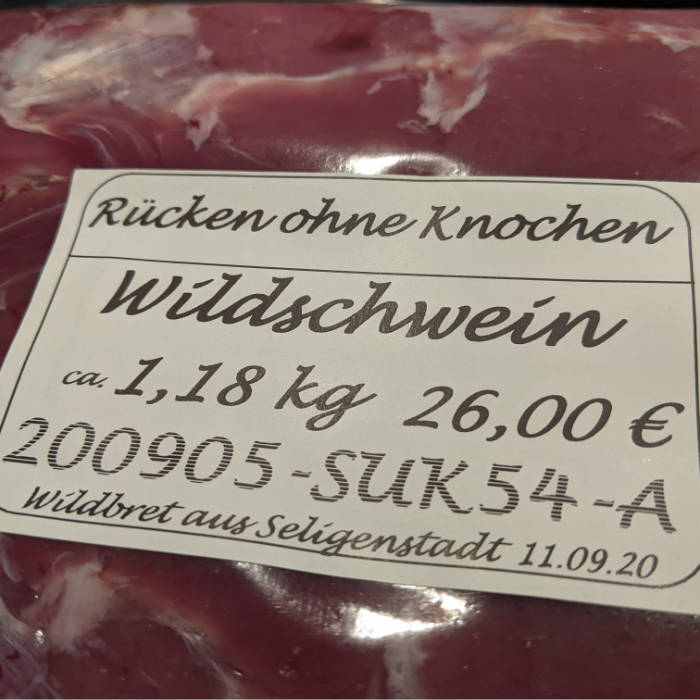
Now to the portion code - an example from practice: " 200905-SUK54-B "
200905 - the shooting date 05 . 09.20 20 - why does the year come first? So that I can see the year and month at first glance. So I can easily see how long it has been in my freezer.
SUK54 - that stands for Pig - Überlaufer -Keiler- 54 kg - together with the shooting date, it can be clearly determined from which piece the portion comes
A - B, C,...,AA,AB etc. - this is the "portion number" of the portion of the corresponding piece. I chose letter combinations because I can tell them apart in a bunch of portions better than a number.
As you can see, this identifier is an easily "readable" description of origin.
With the information on the game species and cut, the respective kilo price is drawn from a price table and the portion price is calculated based on the weight.
This means that everything on the label is compact and appealing to the end consumer.
I'm done, the nice label question is settled
But there is something else - a simple venison management!
If I just continue my label table now, I can quickly see how much of what I still have in the chest via an evaluation using pivot tables.
If you now add two columns when you took something for whom, whether for your own use or for sale, then you can hide these portions and have a simple venison inventory management with label printing function.
I solved it for myself just like that. However, I separated portion management from label printing. I record the portions, have the data written into columns from the information, which I then write into a local Excel file, from which the printer software can then pull the current label information data.
Practical implementation
In practice it looks like this for me:
Before recording, I copy the wild species, shooting date and class down into the new lines that are now to be filled. The portion number is already generated automatically - this was also done manually at first.
I take the portion, select the cut from a dropdown in the line, weigh the portion, enter this in the line and then write the portion number on the portion with a permanent marker.

So I weigh and mark all portions in one go - it's much faster than weighing, labeling, sticking, weighing, labeling, sticking....
When I'm done with that, I move the print data into the intended print data table. This is what the label data for the mail merge looks like, which I copy and paste into Excel:
Then save and start the printer. :-D
Then I stick the venison labels on the portions by briefly comparing the portion numbers.
Complete!
Quickly into the freezer with the good stuff and straight back to the hunting ground :-)
Summary for the DIY Venison Labels
I now always have nice, professional-looking venison labels for my venison portions for little money. Weigh, mark, print, stick - done! In addition, I always and everywhere have an overview of all the delicious things stored in my freezer.
I hope I was able to inspire one or the other with my implementation.
If anyone needs help with the formulas, just let us know.
Leave a comment
All comments are moderated before being published.
This site is protected by hCaptcha and the hCaptcha Privacy Policy and Terms of Service apply.